On to the next phase in the grand conquest of Atelier Sophie: The Ultimate Guide. We left off last time where I made a huge map, and was in the middle of making it dynamic. So now I present the continuation of that endeavor, where I get completely sidetracked and do something else cool.
Yep, I set the map aside for a bit (I will return to it, I promise!) to work on scraping the program for information that isn’t in the various spreadsheets out there. I also can’t seem to find a hex dump of the game that I could scrape for strings, otherwise this would be a lot easier. I’m very tempted to re-buy the thing for PC just so I can have an executable to literally run “strings” on, plus various other command-line utilities. But, alas. So, what crazy adventure did my weird brain come up with this time?
Video > Images > OCR > Text
Yes, I decided to collect the descriptions for all the events in the game by taking a video capture of the game as I paged through all the completed events (which is all of them), and then scrape the video for text.
I’m insane, right?
Yes, but I did eventually figure it out.
I figured I could split the project into a couple bite-sized pieces:
- Capture all the data on video
- Split the video in to one image per unique frame
- Cut the frames into the pieces that I want text from
- Run some OCR on the image frames to grab text
- And mash it all together into some formatted file with perl
Actually, #3 came about as I was messing around, I didn’t think of it ahead of time, but it turned out to be an important step. Otherwise the OCR needs to determine what areas of text represent separate paragraphs and lists – and that’s just too much to ask.
Let there be Video Frames
First things first, I made a video of me stepping through all the events in the game. Honestly, I could have done a bunch of screenshots instead. I figured it wouldn’t be any harder. I’m not sure if I was right – it was on the borderline in the end. If it was half as many frames, I probably should have taken screenshots. But if it was any bigger, I’d really need to do video anyways.
The video:
Next, I needed to split this into pieces. Enter some video processing software that I forgot I hadn’t installed on this laptop yet, because I hadn’t used it in so long, that it was only on the last laptop, several years ago. Thanks to some help from StackOverflow, and the FFMPEG help pages, of course.
$ sudo port install ffmpeg
$ ffmpeg -i all-events.mov -r 5 event-frames/event-thumb-'%03d'.png
That split my MOV file into about 600 separate PNG files with numerical names. 5 frames per second was too much, but it’s better to have to throw away a couple than miss something. In the end, I could have gone with 4 or maybe even 3, but it was a decent guess, honestly.
That ran like a dream, everything I could have wanted, in very little research or execution time. The OCR portion of this process, on the other hand, was quite another story.
Tesseract This!
So I went online and looked for command-line OCR tools. Because everything must be command-line of course. Who uses GUI’s? N00bs? Anyways, the premier one that popped up over and over was “tesseract”, which I found on GitHub/tesseract-ocr. Initially, I tried installing it directly:
$ git clone https://github.com/tesseract-ocr/tesseract.git
$ cd tesseract/
$ ./autogen.sh
Though it ended up needing a few things installed first, due to a strong dependence on an image-processing library called Leptonica, which I downloaded and thought I installed properly:
$ sudo port install autoconf-archive
$ git clone https://github.com/DanBloomberg/leptonica.git
$ cd leptonica/
$ ./autobuild
$ make
$ sudo make install
But Tesseract still wouldn’t install properly.
$ ./configure
checking for LEPTONICA... no
configure: error: Leptonica 1.74 or higher is required. Try to install libleptonica-dev package.
So I tried letting macport do everything for me – I forgot about checking there first, initially. But that ended up failing because I have an old mac that theoretically doesn’t have XCode installed on it, or at least not an updated one. And apple.com disallows old versions for weird, very annoying reasons that I have yet to resolve. So this was a dead end:
$ sudo port install tesseract
Warning: xcodebuild exists but failed to execute
Warning: Xcode does not appear to be installed; most ports will likely fail to build.
However, it DID do one thing for me. It found the Leptonica prerequisite and did install that properly, at least. So now Tesseract installs.
$ ./configure
 $ make
 $ sudo make install
Yes! Finally! Let’s run the thing.
$ tesseract event-thumb-001.png stdout
Error opening data file ./tessdata/eng.traineddata
Please make sure the TESSDATA_PREFIX environment variable is set to the parent directory of your "tessdata" directory.
Failed loading language 'eng'
Tesseract couldn't load any languages!
Could not initialize tesseract.
So, after figuring out I needed eng.traineddata (for english language) and osd.traineddata (for some kind of logic involving finding blocks of text on the screen) on another GitHub page, and properly set my env, I put them in the correct place, and reran:
$ export TESSDATA_PREFIX=/usr/local/share/
$ sudo mv eng.traineddata osd.traineddata /usr/local/share/tessdata/
$ tesseract event-thumb-001.png stdout
The tent's done. I can set out on my journey
, anytime now. What could happen? Who will I

meet? I can‘t even imagine. It'll be a wonderful,
mysterious journey!!

7 I - I am looking forward to my journey. Whatw‘
' kinds of people will I meet...?
Given that this was the literal picture, that was pretty awesome:
However, a long way’s to go. First of all, it was only finding stuff in one area, it wasn’t doing a great job of some of it, it was picking up weird things from the non-text areas, and when I ran it on other pages, it got a lot worse.
How To Train Your Dragon — er, AI
OK so part of the problem is that the game uses a weird font. And after reading up on Tesseract, it turns out you can “train it’s AI” to recognize fonts better. So first, I went through a whole font analysis process up on Identifont to try to find something similar, but nothing looked that close. But when I went through the fonts on OpenOffice one by one, I actually ran into one that was damn close, and it was one of the first I tried, though I had to confirm others weren’t better… Arial Narrow.
 That’s pretty damn close. Arial Narrow doesn’t have the stroke thickness differences of this font, but otherwise, even the kerning lined up perfectly. (The one difference being the double-story “g”, which, ironically, I had just read up about in an unrelated article.)
First, I found a very, very helpful step-by-step article on how to do it, and set about to follow the instructions. A few were a little hard to understand, but I eventually got it.
Next item to install was ImageMagick, a command-line image-modifying tool. It was needed for a step in this process, but it turned out to be a super-cool tool that I ended up using in other ways later, and I’ll definitely use again in other things. In fact, I had just installed it a few days ago back in Part 1 of this blog series, in order to shrink files to precise sizes – so go there for installation instructions.
I made a file filled with the suggested text training regimen, made it Arial Narrow (the closest I could get to the Atelier Font), and ran with it.

I actually screwed up in a few ways, making the fonts too big, and then having to redo it so it all fit on one page. But I made the file, saved it as a PDF, used ImageMagick (convert) to turn it into a TIF file,
$ convert -density 300 -depth 4 eng.arial-narrow.exp0.pdf -background white -flatten +matte eng.arial-narrow.exp0.tif
$ TESSDATA_PREFIX=~/tesseract/ tesseract eng.arial-narrow.exp0.tif eng.arial-narrow.exp0 batch.nochop makebox
Which made an eng.arial-narrow.exp0.box file, which I then had to load up in some kind of editor to make sure that it “boxed things properly” – i.e. properly identified the boundaries of all the letters. For that I installed VietOCR, the only GUI portion of this whole process, and straightened out a few – it had only mistaken a couple smart-quotes.

It was then that I tried to run a program called unicharset_extractor, and couldn’t find it. It turns out that you get it when you install Tesseract… in training mode specifically. Yes, there’s a completely separate install in order to get the training tools.
$ TESSDATA_PREFIX=~/tesseract/ tesseract eng.arial-narrow.exp0.tif eng.arial-narrow.box nobatch box.train .stderr
$ unicharset_extractor *.box
So I found the instructions for installing the training system for Tesseract, and ran with that:
$ sudo port install cairo pango
$ sudo port install icu +devel
$ cd tesseract/
$ ./autogen.sh
$ ./configure
$ make training
$ sudo make training-install
A few more steps to pack the results up and put it in the right location for tesseract to find. Plus a missing step that I found on StackOverflow as well, in red:
$ unicharset_extractor *.box
$ vi font_properties
$ mftraining -F font_properties -U unicharset -O eng.unicharset *.tr
$ cntraining *.tr
$ mv pffmtable eng.pffmtable
$ mv inttemp eng.inttemp
$ mv normproto eng.normproto
$ shapeclustering -F font_properties -U unicharset eng.arial-narrow.exp0.box.tr
$ mv shapetable eng.shapetable
$ combine_tessdata eng.
$ sudo mv eng.traineddata /usr/local/share/tessdata/
And with that, the thing reads Arial Narrow-ish fonts much better!
$ export TESSDATA_PREFIX=/usr/local/share/
$ tesseract event-thumb-001-Important.png stdout
The tent‘s done. I can set out on my journey
_ anytime now. What could happen? Who will I

meet? I can‘t even imagine. It‘ll be a wonderful?
mysterious journey!!

F . . I am Iooking forward to my journey. Whatm\
* kinds of people will I meet...?
Still not perfect, but better. On to make it better, and automate it to grab stuff from many hundred of these PNG files.
Unsharp, Scribbling, and Cropping
Next thing – to try to get the text to be a little better than it is, and to have it detect all of it, not just the stuff it decided was important on the right side of the screen but not at the top-right. First I tried playing with some features that had it look for text more loosely, but when I did, it gave lots of weird crap as well.
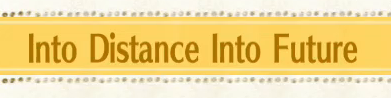
$ tesseract event-thumb-001-Important.png stdout -psm 12
Ep
Events
i
'!A~
\,u
-///_//z://///////
U
Into Distance lnto Future
’
_. - L
@
L1
In Progress
R1
@§
--_-p
B
d&
::Into Distance Into Future
##
H
J
The tent‘s done. I can set out on my journey
anytime now. What could happen? Who will I
meet? I can‘t even imagine. It‘ll be a wonderful?
mysterious journey!!
_--
I am Iooking forward to my journey. Whatba\
‘ -
kinds of people will I meet...?
H
4*
Return
-Er LL-
LA
sz mu“d
So first I thought to use the convert tool to sharpen the edges of the letters. I found the “-unsharp” flag and messed with that, but the results were unexpectedly bad. The text recognition got really bad really quickly, even though, when looking at the files, they didn’t look harder to read at all… first is regular, second, “unsharp”… which is essentially actually a sharpening – not sure why the “un”. But this resulted in complete crap for the OCR.
 ^ This looks blurrier to me, but it was better for the OCR. ^ This looks blurrier to me, but it was better for the OCR. |
 ^ And this looks crisper and clearer to me, but it confused the OCR. ^ And this looks crisper and clearer to me, but it confused the OCR. |
Then I tried looking up some other ways to sharpen images or otherwise prep them for OCR, but those also didn’t pan out very well.
Next attempt, how about blocking out chunks of the image with black lines that will never get interpreted as letters, so that it can focus on the other areas? That lasted about 5 seconds before I realized that if I’m drawing boxes, why don’t I just crop boxes. Why have the OCR guess where the text it, when I can just cut out the boxes of text and tell it to OCR them individually?
It turns out that it’s easy to crop images with the convert tool, and generate new files with just a chunk of the old file.
$ convert -crop  600x50+1084+152 event-thumb-020.png a.png
$ convert -crop 740x200+1042+418 event-thumb-020.png b.png
$ convert -crop 616x328+1136+634 event-thumb-020.png c.png
Which turned the full page into these snippets:
 |
|
 |
|
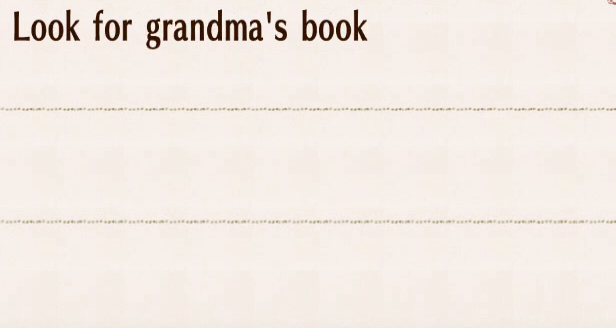 |
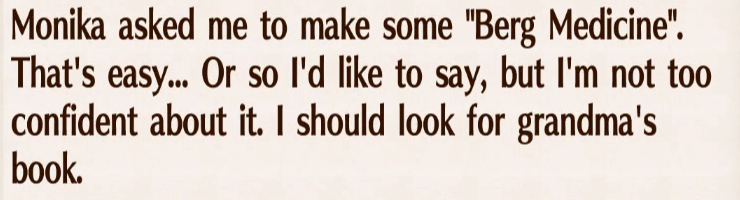
Which now scanned with the results:
Help Out Monika 1

Monika asked me to make some "Berg Medicine“.
That‘s easy... Or so I‘d Iike to Say, but I‘m not too
conf‘ldent about iL I should Iook for grandma‘s
book.

Look for grandma‘s book
Still not perfect, but really good, and I can redirect specific chunks of data differently when parsing and storing.
Mass Production
So now I have a way of chopping up images and parsing text in each box separately, so I’m almost ready to make something that chops up all 500 or so of the frames. But a few things have to be done first. First, I need to get rid of duplicates. I took 5 frames per second – that’s too much. I don’t want to parse a given screen more than once. One would think that it would result in the same thing over and over, and I could just throw away duplicates, but actually, individual frames actually resulted in different OCR results, even though they are (to me, by eye) identical. So I decided to do this part by eye. There may have been a way to automate this, but given that seemingly-identical photos had different binary signatures and sizes, and scanned differently, I thought it would take longer to figure it out than just go through them. I did learn that CMD-DEL on Mac is a hotkey for putting something in a trashcan, though. 🙂 Anyways, I went through 500 of them using the Finder preview mechanism, and it only took maybe 10 minutes.

After that, the 500+ turned into 152 unique frames.
One last step before automation: it was still producing some weird characters from time to time. Not only was it a problem for it to think that lowercase L’s and uppercase i’s were all pipes (|), but if I was to make a formatted data file that would contain all this info, I’d need to choose a delimiter, and comma was out of the question, so I wanted to use pipe for a delimiter (old habit, maybe). So I found that you can limit the letters that it’s allowed to choose from, and banned pipes, which killed two birds with one stone. It still confuses lIlIlI (that’s L’s and i’s by the way – this font sucks for that, too), but at least it wouldn’t make them all pipes.
$ tesseract -c tessedit_char_whitelist='abcdefghijklmnopqrstuvwxyzABCDEFGHIJKLMNOPQRSTUVWXYZ0123456789,.:";()?\!'"'‘’" event-thumb-001.png stdout
Though take note of the red ones. When I left smart quotes out, it insisted that single quotes were also pipe-like, but when I allowed them, it found them much more readily, and I can always strip those out and make them normal quotes later.
So from there, I just put it all together into a perl script:
#!/opt/local/bin/perl
my @files=glob("event-thumb-*.png");


sub getlines($)
{
 my @data=`tesseract -c 'tessedit_char_whitelist=abcdefghijklmnopqrstuvwxyzABCDEFGHIJKLMNOPQRSTUVWXYZ0123456789,.:\?-+"()\!'"'‘’" "$_[0]" stdout -pgm 4 2>/dev/null`;
 return map { chomp; $_ } @data;
}
my $group="Undefined";
my @events;
foreach $i ( @files )
{
 if( $i =~ /-(\D+)\.png/ ) { $group = $1; }
 unlink "title.png";
 unlink "body.png";
 unlink "item1.png";
 unlink "item2.png";
 unlink "item3.png";
 system "convert", "-crop", "600x50+1084+152", $i, "title.png";
 system "convert", "-crop", "740x200+1042+418", $i, "body.png";
 system "convert", "-crop", "616x110+1136+634", $i, "item1.png";
 system "convert", "-crop", "616x110+1136+744", $i, "item2.png";
 system "convert", "-crop", "616x110+1136+854", $i, "item3.png";
 my @title = getlines "title.png";
 my @body = getlines "body.png";
 my @item1 = getlines "item1.png";
 my @item2 = getlines "item2.png";
 my @item3 = getlines "item3.png";
 my @data = ( $group, $title[0], join( " ", @body ), join( " ", @item1 ) );
 if( $item2[0] =~ /\w\w\w/ ) { @data = ( @data, join( " ", @item2 ) ); }
 if( $item3[0] =~ /\w\w\w/ ) { @data = ( @data, join( " ", @item3 ) ); }
 push @events, \@data;
}
unlink "title.png";
unlink "body.png";
unlink "item1.png";
unlink "item2.png";
unlink "item3.png";
foreach my $event (@events)
{
 my @data = @{$event};
 print join( "|", @data ), "\n";
}
And ran it:
$ ./event-frames.pl >| events.psv
With that, I have a working spreadsheet, that came from a video. I still have to do a little more processing to get a few of the inconsistencies out, but it’s a huge leap from literally moving visual media!
Stay tuned for Part 3, when I return to the Map of Doom…