Table of Contents
Summary
After a lot of reading through guide after guide, and discussion thread after thread, I found that not a soul had actually tested the Little Sister Madness Mechanics. Was it the number of things you picked up? Was it the number of battles fought? Time spent in the dungeon? Well, after spending a good part of a day experimenting, I have a definitive answer. And the good news is that it is exploitable. Yes, you no longer have to worry about grinding (too much, some caveats), you can in fact grind, you just have to be very careful about it.
TL;DR = The madness meter is 100% distance traveled.
That’s it. There’s nothing else that it measures. Nothing.
2 minutes and 15 seconds of walking gets you from zero to turning blue, and the other colors have their own times allotted. Chests don’t count, battles don’t count, collectibles don’t count.
Research Methodology
First, I brute-forced it and tried to measure exact numbers of things that I picked up, assuming that it was based on that. However, I found the collectibles to have quite a large range, depending on the situation and the location I was testing out.
For example, when running from the beginning of the Forest of Madness, up to the top of the stump, and down to the left, to catch the green collection points along the way, and then exiting and re-entering, I got about 20 before I hit the blue state. However, if I repeatedly teleported to the end of the Forest of Madness and snagged the 2-3 of them that are very close to the teleport point, teleport home, and repeat, I could get 60 of them before the girls hit blue. For chests, I had to have a fresh set of chests to open, so I did this at the beginning of Chapter 4 and cleaned out the North Star Temple until I hit blue, though this entailed a few quick exits and then walking from the beginning again, which is quite a bit of walking. Which got me thinking. (And later, comparing my walking paths for those several tests to the exemplar path at the end of this guide, I found they line up. I had, in fact, walked that length.)
So, finding this frustrating, I put a character in a big open area and made them run in a circle while I sat and watched a 15 minute YouTube video. When I returned, I was shocked to find the girls in the red stage already! Just 15 minutes!
So I ran in circles and timed how long it took to reach each madness marker, including the girls going missing completely, and found some interesting patterns. It takes 2 minutes and 15 seconds of constant walking to go from green to blue. It takes the exact same amount of time to get from blue to yellow. However, it takes double that to get from yellow to red. And triple the original 2:15 to get from red to purple. That same triple length is also the amount of time you have from the purple state to when they actually disappear. So technically, when you just hit red, you’re less than half way to them running away.
Walking against a wall doesn’t count. Standing doesn’t count, thank goodness, either! So it’s not a simple timer. It’s a distance measured, pure and simple.
What about flying? I also tried flying in circles, and the amount of time almost halved. But flying is almost twice as fast as walking, so that makes sense. Flying won’t help you, but it won’t hurt, either.
| Green | Blue | Yellow | Red | Purple | Gone | |
| Collection Points | 0 | 20-60 | – | – | – | – |
| Rocks | 0 | 20-60 | – | – | – | – |
| Chests | 0 | 10-15 | – | – | – | – |
| Battles | 0 | 12-15 | – | – | – | – |
| Walking | 0:00 | 2:15 | 4:30 | 9:00 | 15:45 | 22:30 |
| Flying | 0:00 | 1:20 | 2:40 | 5:20 | 9:20 | 13:20 |
| Standing | no limit | |||||
| Feedings to Reduce State | 0.66 | 0.66 | 1.33 | 2 | 2* |
NOTE: The times above are from green. If you run for 22.5 minutes straight from a green state, your girls will all be gone. The 2* at the end is because if you are just about to lose one sister, it will take 2 full feedings to barely get them back to red – once they’re gone, they’re gone, you can’t feed them to get them back to purple.
Madness is a Continuum
I also tried feeding them just as they hit a new stage, and just before they’re about to hit a higher one, and that resulted in some interesting information as well. Firstly, the madness meter is a continuum, not discrete. The colors are just discrete markers. That is, when you get to a certain number of madness “points”, it flips to the next color, but it’s really an indicator of an underlying number, not just one state and the next.
What this means is that you can’t cheese it by getting it deep into blue, and then feeding them, and getting it back to zero, thus “saving” yourself that extra in the blue. No matter what, the underlying number remains, invisible, and you’ll be “deep into the green”, not back to zero.
Also, one full feeding of 5 dragon meat restores more than the difference from zero to barely blue. It restores 1.5x that much. So if you feed them just as they hit blue, you will actually waste food, because you get them all the way back to zero and then some – but you can’t go below zero. Therefore, don’t feed them until they’re deep into the blue, or into the yellow, or else you might waste food.
This also explains a couple of other phenomena. If you’re barely into the yellow, and feed them, you can end up skipping all the way to green in one go. You’ll be deep into the green and turn blue very shortly, but still, this is why. It’s also why it takes 1-2 feedings to go from red to yellow, or purple to red. It’s because those markers are further apart.
So if you walk for two segments of 2:15, you’ll incur “200 madness points” and be just at the blue-yellow boundary, and if you feed them 5 dragon meat, it will go down “150 madness points”. You’ll be back in the green, but still technically halfway back to blue. If you walk only 2:15 and barely get into blue, incurring 100, and feed them once, then 50 of that feeding goes to waste because you can’t go below 0. (I just invented the equivalence of 2:15 and 100, the 100 is an arbitrary number.)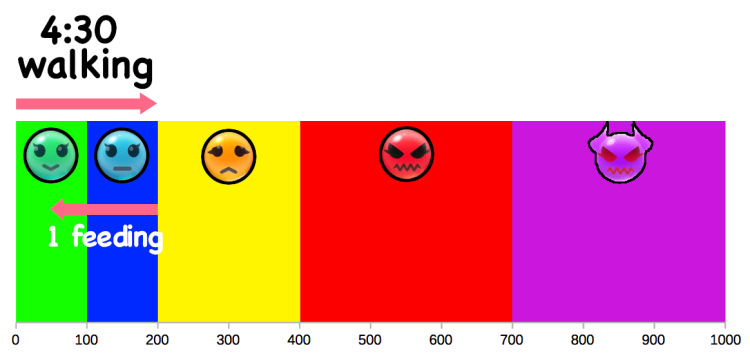
Practical Applications
If you continuously teleport to a location rich in rocks or collection points, you can harvest them repeatedly and get over 50 of them while only going one stage up in madness.
If you’re careful about your walking path and backtrack only when necessary, and make use of teleporting to the beginning or end of the area efficiently, you will keep your madness under red at all times.
If you camp at an enemy spawning point, you can grind to your heart’s content †. Just don’t move too much between battles. The battles themselves don’t advance the meter, only running from one battle to another does. This is somewhat annoying in that you have to wait the spawning period each time, but it’s better than nothing. († there’s caveats to camping, see below.) You can also repeatedly devour and run.
If you explicitly want to kill the girls, like if you have saved before the point of no return and are on the True Ending path, but need one of them to die to see the Normal Ending, you can literally just watch a video or something for 25 minutes while holding the controller to run in a circle, and that will guarantee killing all three of them. Or do it for 15 minutes, feed a couple of them, and then another 10 to finish the one off. However, just overfeeding one sister is quicker, so this isn’t recommended – also, use dragon blood instead of meat, if you’re trying to kill one, as it incurs a larger hit on the purple bar.
Camping and Grinding
The way that spawns work in Varnir doesn’t quite allow sitting around, unmoving, waiting for monsters to spawn again. Some spawn points do seem to work this way, but most of them don’t respawn until you’re a little ways away. Otherwise this would be infinite respawning and perfect. Too bad.
What you can do is a couple things:
- Get in a fight and devour everything except one monster, then RUN. (That’s L1 on PS4 by the way, they never show you.) You don’t gain EXP and GOLD from an escape, but you DO keep all cores! And the enemy spawn doesn’t go away! You can thus just re-enter the fight and devour again, until everyone has the cores from all monsters.
- This means that every core, other than the ones where a creature only ever appears alone, can be collected for every character in one series of battles that don’t advance the madness bar at all, because you’re standing in place re-engaging the same monster without moving.
- Note that some monsters duplicate when hit, so this is a good way to devour multiples of them in one battle. Or to permit you use a solo enemy and still grind it: make it duplicate, eat the duplicate, and then run. Then quick-save (just in case) and repeat.
- Also some monsters summon other monsters with a train-whistle sound effect. You can use this to farm those other monsters and then run. Note some summon different monsters each time, up to 3 times, so if you find a summoner, let it summon up to 3 times to see what’s possible.
- Monsters that are hard to hit and also run away are the worst. I suggest turning it to Easy difficulty while farming those. It doesn’t make them easier to hit, but you’ll be annoyed less by other enemies while trying to hit them. It’s important to quick-save between these battles, as if the last enemy runs, the enemy spawn disappears and can’t be re-engaged.
- Save in town and teleport to the beginning or end of a dungeon, wherever there’s a tighter bunch of monsters, so that you don’t have to move far to beat them all. Then use Minessa’s exit and do it again. If the creature selection isn’t what you want, reload to the town and teleport back in again – it will reroll all the spawns.
- You can also use elixirs to grind. It’s limited, and you should probably up the difficulty to get more EXP out of it, but it does count for EXP and gold.
Time vs Distance
So far, we’re only talking about time. The reason for that is that measuring distance is not very accurate, but the time was extremely repeatable and exact. That being said, how “far” is “two minutes and fifteen seconds”? Well, for reference, running from the entrance of the Forest of Judgement all the way to the far back of the last area is about 45 seconds. So you could run that, and back, and forwards again, and you would just barely turn all the girls blue.
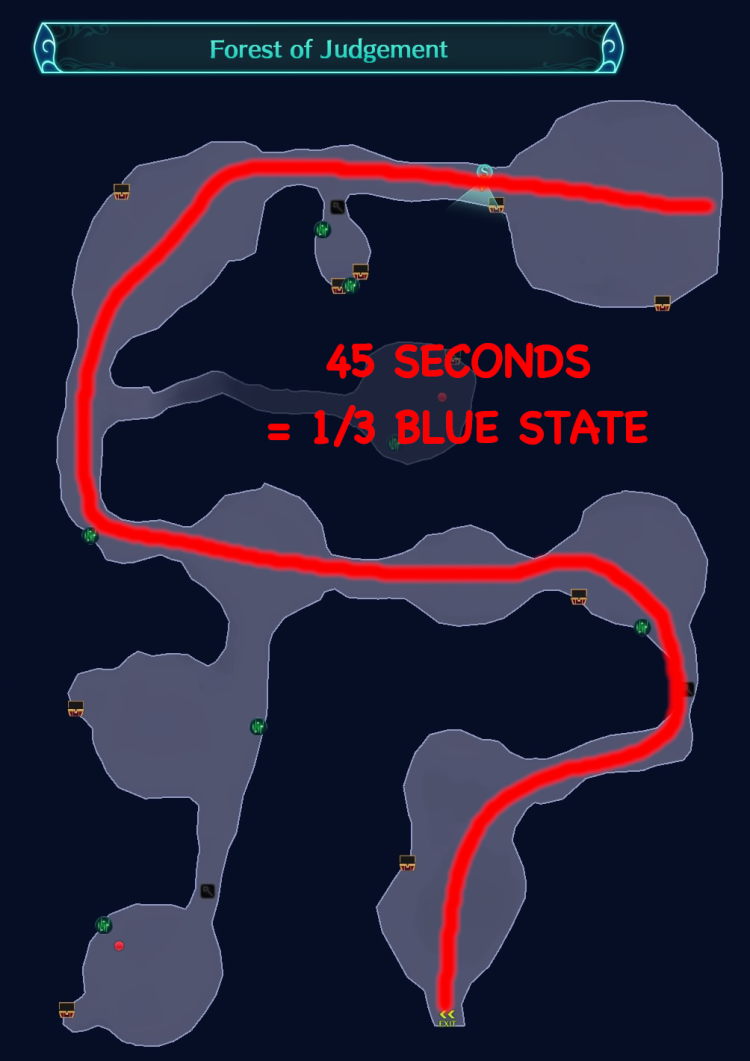
So if you can imagine twisting that red line into your walking path on any given dungeon, you can have a general idea of the distance you can expect per madness stage. Basically, if you are efficient about walking, use teleporting home and reentering (or teleporting to the end) in an efficient way, you can probably clean out every dungeon in 1-2 madness stages, and that’s plenty of leeway to get to the end of chapter 10, after which point the girls’ meters freeze and you’re safe in chapter 11. However, don’t go back and forth to farm enemies, either camp on a spawning point or don’t do it at all. Don’t jog back and forth, zig-zagging everywhere to get all the rocks and collection points. Maintain a smooth travel path or else forego things.
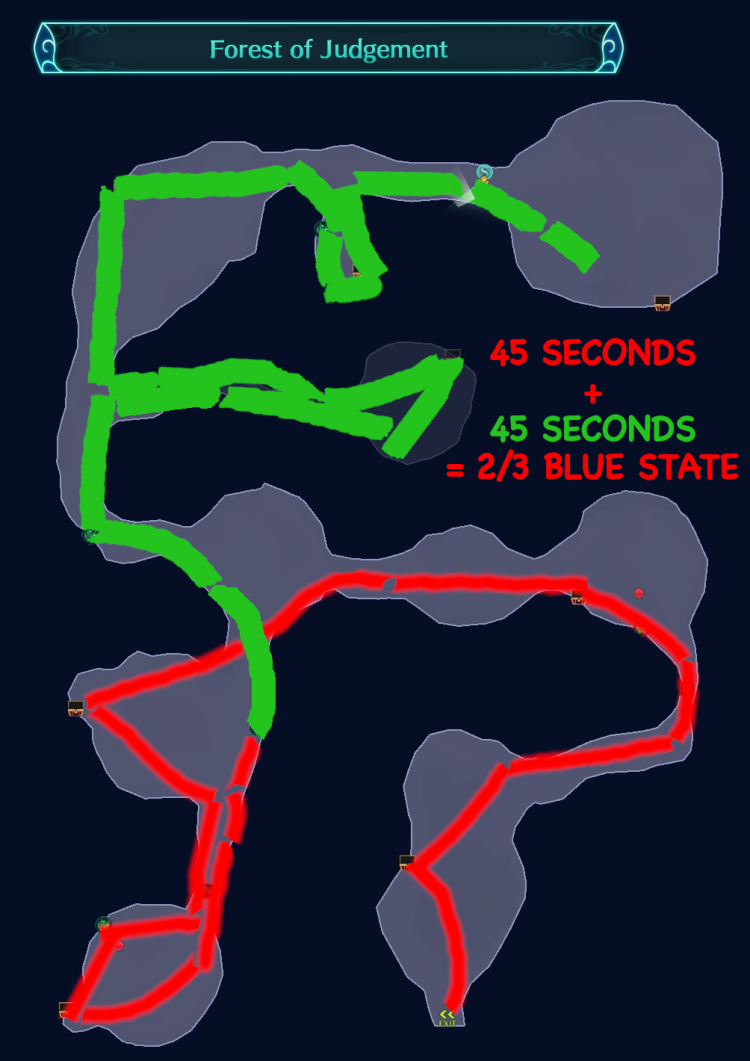
For example, I carved up the red 45-second path above and pasted it in the form of a full traversal of the Forest of Judgement, like bunching up and stretching a string. That is, hitting every collection point and chest. And it’s just barely a little longer than twice the red path, so 90s. So if one isn’t zig-zagging and bouncing back and forth, or backtracking just to grind, one can hit all the collectibles (I didn’t count rocks) within 2/3 of one “green to blue”.
Expectations
For reference, I followed my own advice above, farmed every core for every character (from the point I got each character, I didn’t go back to grind Faria), and cleared out every single chest on my NG true-ending route, minus the ones behind the locked doors that I went back for later in post-game. I only incurred:
| Chapter | End State | Feedings | Cost | Purple Gauge |
|---|---|---|---|---|
| 4 | Blue | 1 | (4500) | 3% |
| 5 | Blue | 1 | (4500) | 7% |
| 6 | Yellow | 2 | (9000) | 13% |
| 7 | Yellow | 2 | (9000) | 20% |
| 8 | Deep Yellow | 3 | 9000* | 30% |
| 9 | Yellow | 2 | 6000 | 37% |
| 10 | Deep Yellow | 3 | 9000 | 47% |
So by the end of Chapter 10, I was slightly below the halfway point on the purple dragon fullness scale. (Numbers in parens I didn’t actually spend because I had enough meat already). *9000 is starred because meat reduces to 200g each around this point.
For one-floor dungeons, you can probably clean them out, and grind by camping spawning locations, and only cause a green->blue. That will cost you 1 feeding x 3 girls x 5 dragon meat x 300g = 4500g. For two-floor ones, you might end up with green->yellow. That will cost 2-3 feedings x 3 girls x 5 dragon meat x 300g = 9000-13500g… 6000-9000g when meat goes down to 200g. Up through chapter 7, you probably have enough meat on hand without even having to buy it. After that, you make more than enough from enemies to purchase sufficient meat, and the price lowers as well.
This is extremely affordable, and there’s literally 100% leeway if you do it this way. And this is if you really want to max every core and get every chest… whereas, if you follow an FAQ and know what’s in the chests, you can probably skip most of the chests and only get the ones with unique quest items in them or the next upgrade of weapons or armor. If you do less, don’t farm cores, don’t get every chest, you can probably get away with half that, i.e. end Chapter 10 with merely a 25% purple gauge.